Hand tracking
Hand tracking with Varjo headsets works with Ultraleap Tracking Plugin. Varjo OpenXR runtime also supports the XR_EXT_hand_tracking extension, which allows developers to access hand tracking data using Unreal’s built-in OpenXRHandTracking plugin.
Using hand tracking with Ultraleap Tracking Plugin
The recommended way to use hand tracking in Unreal is using Ultraleap Tracking Plugin. You can find the plugin and documentation here.
To be able to use all hand tracking features, keep Use OpenXR As Source disabled in Leap Options.
Setting correct offsets for hand tracking cameras
When OpenXR is not used as the tracking source, you need to define an offset for the hand tracking cameras. This is necessary because the head tracking point for your headset differs from the hand tracking point for Ultraleap. Read more information about the hand tracking offsets here.
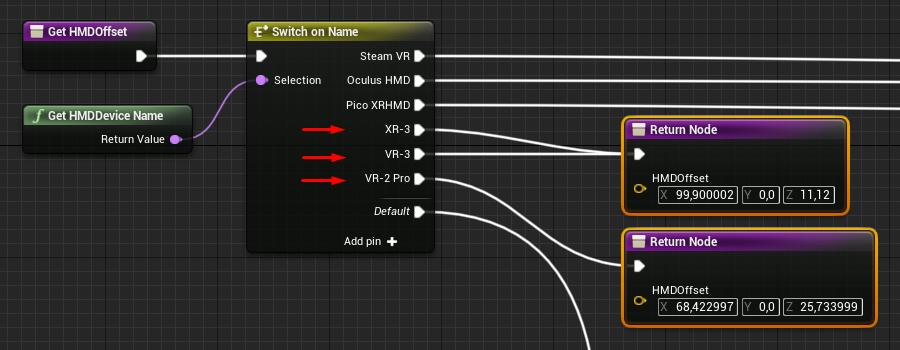
The HMD offsets are defined in Leap Options struct. To handle the offsets in the provided IEPawnHands, modify the Get HMDOffsets function by adding cases for XR-3 and VR-3 in the Switch on Name node.
The correct offset for XR-3 and VR-3 is:
    X:       99.9
    Y:       0
    Z:       11.12
For everything else, please refer to the Ultraleap documentation.
Using hand tracking without Ultraleap Tracking Plugin
Make sure that the OpenXRHandTracking plugin is enabled in the project. It should be enabled automatically if the Varjo OpenXR plugin is also enabled in your project.
![]()
You can access basic hand key data also without Ultraleap Tracking Plugin.
When hand tracking data is available, you can access it with the Get Motion Controller Data blueprint node. Hand key data for each hand is provided in the Hand Key Positions, Hand Key Rotations, and Hand Key Radii arrays.
![]()
Simple hand tracking visualization
This example shows a simple way to visualize the tracked hands. Start by adding an empty actor in your scene and converting it into a blueprint.
![]()
Open the created blueprint.
We will visualize the hands by rendering a cube for each hand key. First, add an Instanced Static Mesh component. Select a static mesh and assign a material. Make sure to set Transform > Mobility to Movable.
![]()
Open the Event Graph of the blueprint.
Clear any existing instances of the Instanced Static Mesh and get the latest hand tracking data with Get Motion Controller Data in the Tick event.
![]()
Use the Break XRMotionControllerData node to access individual variables in the struct. Continue only if the provided Motion Controller Data is valid.
Use the length of Hand Key Positions to iterate through the arrays using a for loop. Use Get nodes to get Hand Key Position, Hand Key Rotation, and Hand Key Radius for each index.
![]()
In the body of the for loop, use the Make Transform node to create a Transform for each Key. Then, use Add Instance World Space to create an instance of the Instanced Static Mesh with the given Transform.
Repeat the steps for the other hand.
![]()
If you now run the scene in VR Preview, you should see the tracked hands being rendered. If you didn’t disable collision for the Instanced Static Mesh, you can also interact with physics.
![]()
You can further fine-tune the visualization, for example by hiding the hand when it’s near a VR controller.
![]()
Disable motion controllers being rendered in hand location
Hand key data is currently provided inside the Motion Controller Data struct. As a side effect, if you have Motion Controller components with Visualization enabled in your scene but have no motion controllers connected, the Motion Controller component renders the controller models using the location of the user’s hands.
To disable this behavior, you can hide the motion controllers (for example in the VRPawn blueprint included with the VR Template) when the Tracking Status in the Motion Controller Data is Not Tracked.
![]()