Varjo Lab Tools
Varjo Lab Tools is intended for experienced Varjo users who want to get more out of their Varjo hardware and compatible applications. You can get Varjo Lab Tools from Downloads. Varjo Base must be installed and running to use Lab Tools.
You can find further information on the different tools inside Varjo Lab Tools. Press  for individual tooltips.
Varjo Lab Tools is constantly updated based on feedback from our user community.
Note that other applications may control and override the values that you set in Lab Tools.
- Modes
- Save & Load
- Masking
- Masking VR controls
- Masking modes
- Camera settings
- Video depth testing
- Chroma key settings
- Skeletal hands
- Command line arguments
- Release notes
- FAQ
- Where can I learn more?
- How is Varjo Lab Tools built?
- What is a difference between alpha and blend control mask?
- How can I use the chroma key cockpit?
- What to do if Lab Tools is stuttering?
- Where are Lab Tools logs?
- I want to use Lab Tools’ features in my own native application. How to do that?
- I want to use Lab Tools’ features in my own Unity application. How to do that?
- I want to use Lab Tools’ features in my own Unreal or OpenXR application. How to do that?
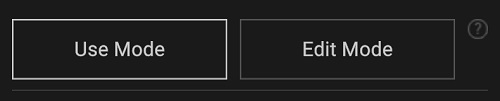
Modes
Lab Tools has two modes: One for editing your setup and another for using it. You can change between modes at any time by pressing the mode buttons.
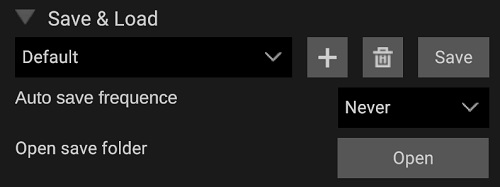
Save & Load
You can save and load setups in Lab Tools. To duplicate a setup on another computer, save your setup and copy it to another computer.
Masking
Create masks to mix real life with virtual content. Masks can be mixed with chroma key to create more complex setups.
Add a mask mesh either by importing 3D models (in OBJ format) or by using the VR mask editing tools in Lab Tools.
Using masks with Lab Tools comes with a performance penalty, and we recommend creating mask support directly in your application if possible.
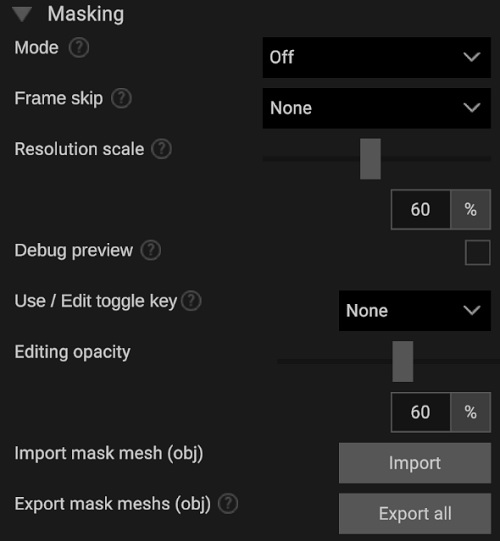
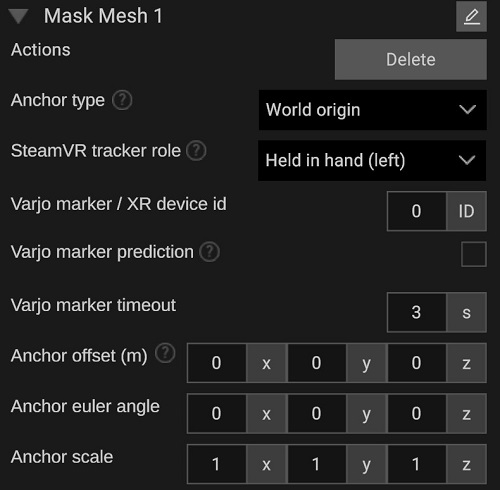
Each mask has its own values that can be edited individually. When using a VR controller to create a mask, these values typically do not need to be edited. If you don’t have access to a VR controller, you can import new masks and reposition them using the following values:
Masking in Varjo Base
If you have an active Varjo Base Pro license and Varjo Base version 4.11 or newer, you can save masks that you have configured in Lab Tools and load them directly to Varjo Base to apply masks without having Lab Tools open. Read more about Masking in Varjo Base.
The settings for the masks need to be configured before loading them to Varjo Base, and they can only be modified in Lab Tools. The following settings will be applied to Varjo Base with the mask:
- Mode
- Persistent Varjo markers
- Anchor type (World origin, Varjo Marker, SteamVR Tracker)
- SteamVR tracker role
- Varjo marker id
- Varjo marker timeout
- Anchor offset
- Anchor euler angle
- Anchor scale
After you have configured your mask, save your whole setup and load it to Varjo Base:
- Navigate to Save and load setups.
- Select Save.
Note that the setup file needs to be configured with Varjo Lab Tools version 1.5.6 or newer.
Masking VR controls
You can create and edit masks in VR. Only a single connected controller is required. While the graphics will always show a Vive controller, you can use other controllers as well.
Note: Mask creation in VR is not intended to be a full 3D modelling suite, but rather a quick tool to create simple masks. For more complex and fully accurate masks, we recommend that you create them in your preferred 3D modelling suite and import them into Lab Tools.
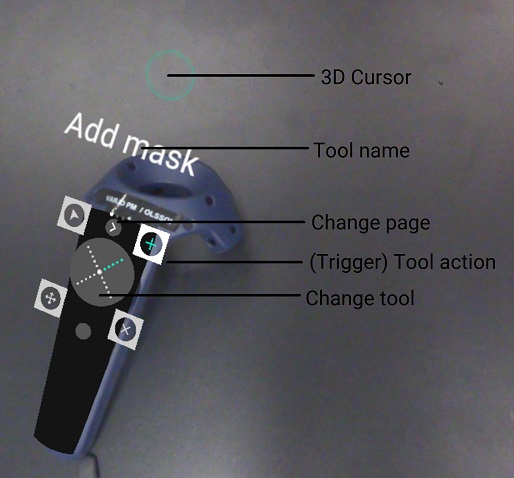
Change page
Switch between pages page by pressing the Menu button. Change tools by pressing the touchpad. Use a tool by pressing the trigger. The VR UI in Lab Tools consists of three pages. Page 1: Mask tools Page 2: Vertex tools Page 3: Selector settings
Page 1: Mask tools
Add mask

Creates a new mask. Opens the mask anchor selection.
Mask anchor selection
When creating a new mask, you need to select an anchor for the mask.

World origin: The origin point of the world. This usually refers to the center of the room and floor level.
![]()
Varjo Marker: A printed marker from Varjo. The behavior and id of a marker can be adjusted in the 2D interface.

XR device: Any connected and tracked device, for example a headset, controller, or tracking puck. The device id can be changed in the 2D interface.

Cancel: Cancel creating a new mask.
Confirm your selection by pressing the trigger. The anchor nearest to the cursor and of the selected type is used. After you select an anchor type, the tool changes to Add vertex so that you can begin modelling the mask.
Select mask

Select the mask nearest to the cursor. After you select a mask, the tool changes to Move vertex so you can begin editing the mask.
Move mask

Hold the trigger to move the mask nearest to the cursor.
Remove mask

Delete the mask nearest to the cursor.
Page 2: Vertex tools
Add vertex

Add a new vertex connected to the two nearest vertices to create a triangle.
Move vertex
Hold the trigger to move the vertex nearest to the cursor.
Fill polygon

Create a new triangle between the three closest vertices.
Remove vertex
Remove a vertex and all connected triangles.
Page 3: 3D cursor settings
Cursor distance
With this feature you can reach further than your hand and controller can. Press up or down on the touchpad to move the cursor forwards or backwards.
Cursor smoothness
With this feature you can smooth controller movement to be more stable. Press left or right on the touchpad to increase or decrease the smoothness of your cursor movement.
Masking modes
Lab tools supports blend control masks for masking out other applications. Set the mode for masking.
See blend control mask documentation for detailed information and examples.
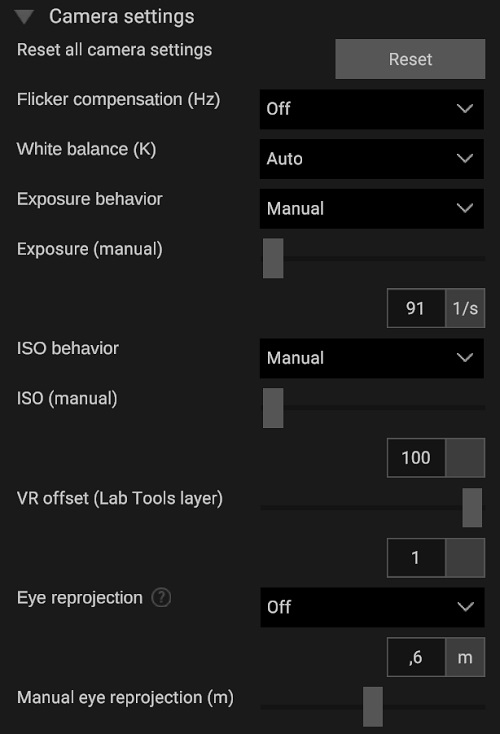
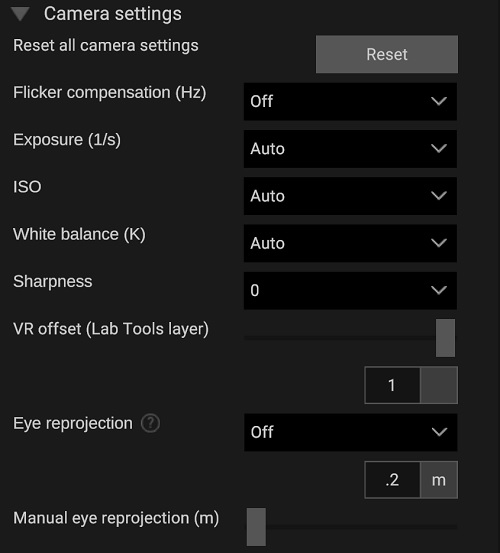
Camera settings
You can control various video pass-through camera settings with Varjo Lab Tools. This allows you to adjust your mixed reality experience to suit more challenging visual conditions, where the default behavior may not be suitable. This disables camera settings from Varjo Base.
Varjo XR-4 and XR-3 headsets will display different settings, unique to the featureset of the headset.
Video depth testing
You can adjust or override the current settings for video depth testing. For example, this allows you to see your real hands inside the application.

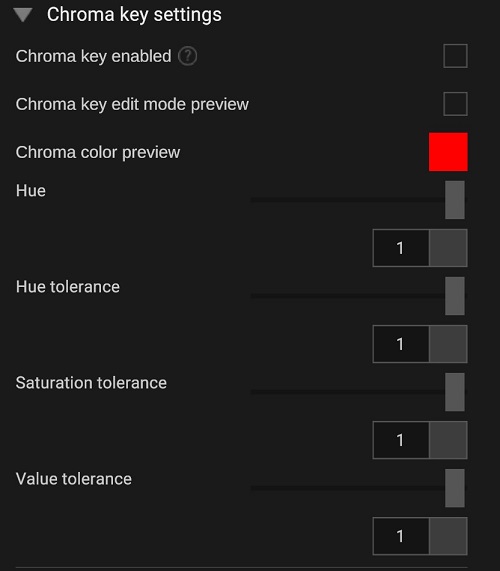
Chroma key settings
You can enable global chroma key and override current chroma settings. This disables chroma key option from Varjo Base.
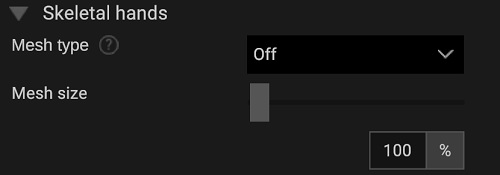
Skeletal hands
You can generate a textured 3D model or a mask mesh from your hands. Based on the skeletal structure provided by our hand tracking, a simple 3D mesh is placed over your hands. Ultraleap module is required for this feature.
Command line arguments
Lab Tools can be launched from command line with optional arguments. The arguments are handled after Lab Tools has fully launched itself.
"-l filename" or "--loadSave filename" will load a spesific save file.
"-a" or "--autoUse" will put Lab Tools to Use Mode.
Most Unity’s default command line arguments are also supported.
Release notes
Lab Tools is tested with the most recent public version of Varjo Base at the time of its release. You can see which Varjo Base version the testing was done with in the downloads section. Newer Lab Tools may work with older Varjo Base versions as well, but we do not guarantee that. However any version of Lab Tools always works with the latest Varjo Base as Varjo APIs are backwards compatible.
1.5.7
- Remove SteamVR tracker geometry
- Update Unity version to fix security vulnerability
1.5.6
- Fix mask obj exporting
1.5.5
- Add manual camera focus distance
- Improve default settings values and value resetting
- Improve tooltips
- Fix mask renaming
1.5.4
- Add persistent Varjo markers option
- Only allow letters, numbers, ‘_’ and ‘-‘ in file names
- Prevent loading invalid json files
1.5.3
- Fix resolution scale, frame skip and mask opacity sliders
1.5.2
- Add blend control mask mode example images
- Add XR-4 camera settings (shown when XR-4 is connected)
- Improve window scaling
1.5.1
- Add Ultraleap 2 module support
- Add Mask visibility toggle for Use Mode
1.5.0
- Add Varjo Controller support
- Fix Varjo markers not managed correctly
- Disable anchoring to head or controller in immersive ui
1.4.0
- Add role based SteamVR Tracker anchor support
1.3.1
- Major bug fixes
1.3.0
- Add depth mask modes
- Add Use Mode info
- Add Varjo marker timeout to mask mesh values
- Add command line arguments for automation
- Add Index controller model
- Add textured hand
- Add adjustable vr offset to Lab Tools layer
- Reorganize hand settings
- Mask mesh replace to autoselect mask if nothing is selected
1.2.2
- Add lock to chroma, depth and camera settings when used
- Add invalid anhcor warning
- Show anchor ids in immersive ui
- Increase default edit opacity
- Fix polygons not filling on new vertex add
- Fix cursor appearing in use mode
1.2.1
- Improve skeletal hand mesh
- Prevent depth test near to be less than far
- Prevent user from typing invalid file names
- Fix chroma settings not saving correctly
1.2.0
- Add mask mesh export
- Add mask mesh renaming
- Add hand mask mesh support
- Add edit mode toggle key
- Add global chroma key support
- Add save copy option
- Optimize high poly mask editing
1.1.0
- Add masking support
1.0.0
- Add video depth testing
0.9.0
- Add camera settings
FAQ
Where can I learn more?
We have a hands-on webinar about the subject: Insight Session: Customize your mixed reality experience with Varjo Lab Tools and a follow up Q&A post.
How is Varjo Lab Tools built?
Varjo Lab Tools is a Unity application, built with Varjo Unity XR SDK. All features the tool uses are in public Varjo APIs.
What is a difference between alpha and blend control mask?
Alpha mask adds masking to the application it is called from, retaining all the rendered 3D content on the layer. Blend control mask is a special layer that adds masking to other applications, but that layer itself cannot render anything else than the masks. Varjo Lab Tools uses blend control masks.
Alpha masks and blend control masks can be mixed. Thus Varjo Lab Tools can add more masking to an application that already uses alpha masks. Only one application can access blend control masks, so if your application is already using blend control masks, Lab Tools cannot be used. Multiple Lab Tools cannot be run either due the same reason.
How can I use the chroma key cockpit?
We have a blog post about the subject: Mixed reality driving: Real hands on a virtual wheel
What to do if Lab Tools is stuttering?
Keep Lab Tools application window focused (on top) in Windows for the best masking performance. Make sure the other application you use with Lab Tools is running stable 90fps and leaves extra processing time for Lab Tools.
Where are Lab Tools logs?
%USERPROFILE%\AppData\LocalLow\Varjo\VarjoLabTools
I want to use Lab Tools’ features in my own native application. How to do that?
- Multi-app functionality is documented here.
- Mixed reality rendering is documented here.
- Marker tracking is documented here.
- Blend control mask is documented here.
- Camera settings are documented here.
- VR offset is documented here.
- Video depth test documented here.
- Chroma key is documented here.
- Hand tracking is documented here.
I want to use Lab Tools’ features in my own Unity application. How to do that?
Please note that Unity can only render a single layer on a single application. When implementing blend control masks to your own application, remember that you cannot render anything else but the masks for the application that does masking with blend control masks. Consider if alpha masks are enough for your application as both virtual content and masks can be rendered on the same application with them. Otherwise you need to run two applications, one for blend control masks and an another one for the virtual content.
- Multi-app functionality is documented here.
- Mixed reality rendering is documented here.
- Marker tracking is documented here.
- Blend control mask is included in VarjoBlendControlMask.cs. See the file for documentation. Native blend control mask documentation and example are also good sources for more information on the subject.
- Camera settings are documented here.
- VR offset is accessed with
VarjoMixedReality.SetVRViewOffset(double percentage). - Video depth test documented here.
- Chroma key is documented here.
- Hand tracking is documented here.
I want to use Lab Tools’ features in my own Unreal or OpenXR application. How to do that?
- Multi-app functionality is not available in Unreal or OpenXR. (native applications can still be mixed with OpenXR applications, OpenXR applications are always use priority 0)
- Mixed reality rendering is documented here.
- Marker tracking is documented here.
- Blend control mask is not available in Unreal or OpenXR.
- Camera settings are not available in Unreal or OpenXR. We recommend using camera controls from Varjo Base.
- VR offset is controlled by
XR_VARJO_view_offset. - Video depth test documented here.
- Chroma key is not available in Unreal or OpenXR. We recommend using chroma key from Varjo Base.
- Hand tracking is documented here.
See OpenXR extensions for OpenXR documentation.