Varjo Markers with Varjo XR plugin
Note: you are currently viewing documentation for a beta or an older version of Varjo
Varjo Markers can be used to track static or dynamic real-world objects using XR-1 Developer Edition’s video pass-through cameras. See the document Varjo Markers for generic information and printing instructions.
Varjo Markers are usually used in mixed reality applications, but they can be also used without video see-through rendering in virtual reality applications to align virtual objects in the scene with physical objects in the real world.
This document describes how to use Varjo Markers with the Varjo XR Plug-in.
Making a GameObject track a Varjo Marker
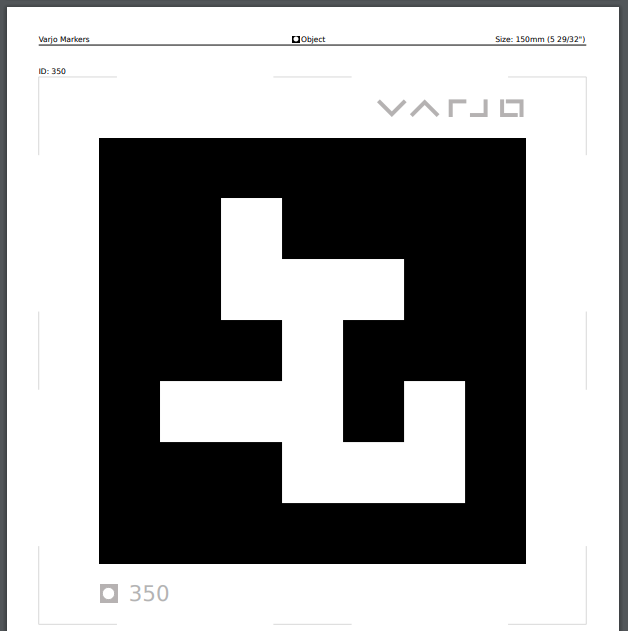
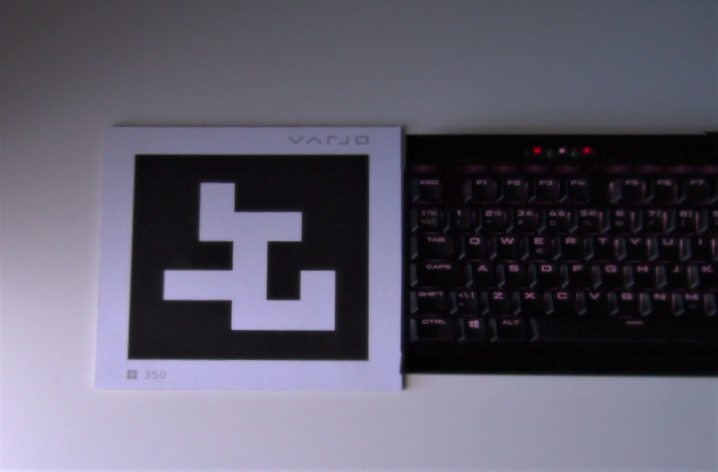
Start by printing out a Varjo Marker. The printable markers and instructions can be found from Varjo Markers page. Please read the printing instructions carefully for optimal printing quality.
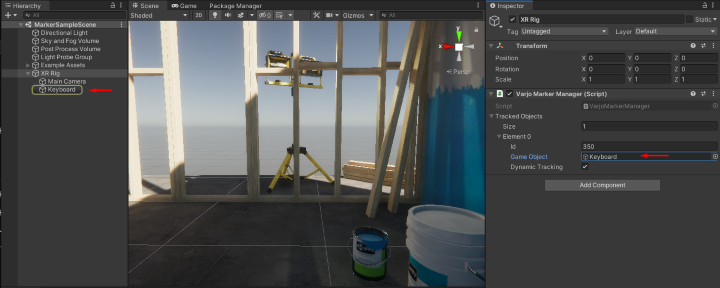
In this documentation we use a large marker with ID 350.
You need some sort of manager script to handle all the tracked markers in your Unity scene.
Let’s create a new script called Varjo Marker Manager and add it in one of the GameObjects in the scene.

As all the other Varjo XR plugin features, Varjo Markers can be found from namespace Varjo.XR so make sure to add the using directive in the beginning of the CS file.
using Varjo.XR;
Next you need to add some way to define GameObjects which will be following the tracked markers. You could for example create a simple array of structs to store ID-GameObject pairs that can be edited in the Unity Inspector. Add this piece of code in the beginning of VarjoMarkerManager class.
// Serializable struct to make it easy to add tracked objects in the Inspector.
[Serializable]
public struct TrackedObject
{
    public long id;
    public GameObject gameObject;
}

// An public array for all the tracked objects.
public TrackedObject[] trackedObjects = new TrackedObject[1];
Add couple more fields in the class. The manager script needs to keep track of all the markers in the environment so add a list to store all the found markers and another one for IDs of markers which have detected before but have not been visible anymore for longer than the duration of the marker timeout.
// A list for found markers.
private List<VarjoMarker> markers = new List<VarjoMarker>();

// A list for IDs of removed markers.
private List<long> removedMarkerIds = new List<long>();
Before you try to get any marker data, you need to enable the Varjo Marker tracking.
Add the following to have Varjo Markers enabled only when the object is active and enabled.
private void OnEnable()
{
    // Enable Varjo Marker tracking.
    VarjoMarkers.EnableVarjoMarkers(true);
}

private void OnDisable()
{
    // Disable Varjo Marker tracking.
    VarjoMarkers.EnableVarjoMarkers(false);
}
Now all you need is the actual logic of the marker manager. In this example script we update the marker data in the Update loop. If Varjo Marker tracking is enabled, we get the list of the latest marker data and update all the GameObjects in our trackedObjects array which have an ID matching an ID of a marker in the markers array.
We also get the list of IDs of removed markers and deactivate any matching GameObject in the trackedObjects array.
void Update()
{
    // Check if Varjo Marker tracking is enabled and functional.
    if (VarjoMarkers.IsVarjoMarkersEnabled())
    {
        // Get a list of markers with up-to-date data.
        VarjoMarkers.GetVarjoMarkers(out markers);

        // Loop through found markers and update gameobjects matching the marker ID in the array.
        foreach (var marker in markers)
        {
            for (var i = 0; i < trackedObjects.Length; i++)
            {
                if (trackedObjects[i].id == marker.id)
                {
                    // This simple marker manager controls only visibility and pose of the GameObjects.
                    trackedObjects[i].gameObject.SetActive(true);
                    trackedObjects[i].gameObject.transform.localPosition = marker.pose.position;
                    trackedObjects[i].gameObject.transform.localRotation = marker.pose.rotation;
                }
            }
        }

        // Get a list of IDs of removed markers.
        VarjoMarkers.GetRemovedVarjoMarkerIds(out removedMarkerIds);

        // Loop through removed marker IDs and deactivate gameobjects matching the marker IDs in the array.
        foreach (var id in removedMarkerIds)
        {
            for (var i = 0; i < trackedObjects.Length; i++)
            {
                if (trackedObjects[i].id == id)
                {
                    trackedObjects[i].gameObject.SetActive(false);
                }
            }
        }
    }
}
Back in the Unity Editor, select the GameObject you want to follow the Varjo Marker.
As the pose in the Varjo Marker is relative to the tracking space, you probably want to make the GameObject a sibling of the XR camera. Make sure the GameObject is not flagged as static.
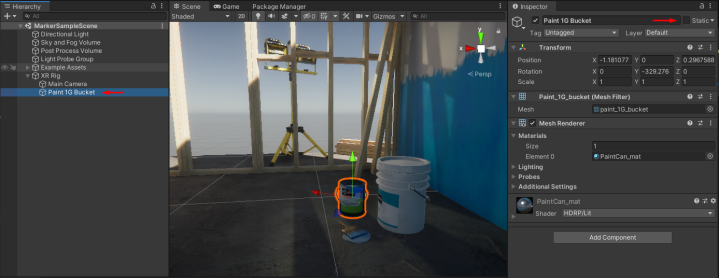
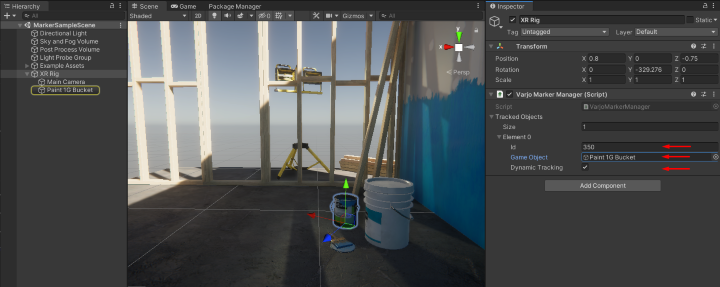
Add the GameObject in the array of TrackedObjects in your VarjoMarkerManager and set the ID matching the ID of a printed Varjo Marker.
You can have as many tracked objects as you want. Just make sure you don’t have multiple printed markers with the same ID in the environment.
Press Play and look around. If XR-1 Developer Edition’s video pass-through cameras see a printed marker with an ID matching one of the TrackedObjects, you should see the GameObject following the position and rotation of the marker.
Varjo Marker contains much more than just position and rotation. You can easily for example make the size of the object match the size of the Varjo Marker. If you do this, please note that the y-size of a flat marker is very small, so you probably want to use x or z axis to control also the height of the object.
The ID and the size of a Varjo Marker never change so it’s enough to set them when the marker is found for the first time.
Using a Varjo Marker to align a video see-through mask with a real-world object
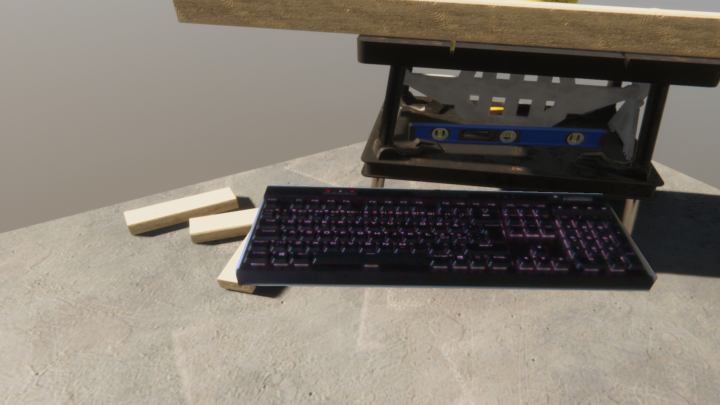
One of the most common uses for Varjo Markers is aligning a video see-through mask with a physical object in the environment. This is used to bring objects like input devices or instruments from the real world into a virtual environment.
In these instructions we create a simple mask to show a keyboard inside a virtual environment.
Continuing from the instructions above, replace a tracked GameObject with an empty GameObject. Add this GameObject in the TrackedObjects array with an ID matching your printed Varjo Marker.
Place the printed Varjo Marker next to your keyboard. Usually you would want to attach the marker in the physical object so that it moves along with it.
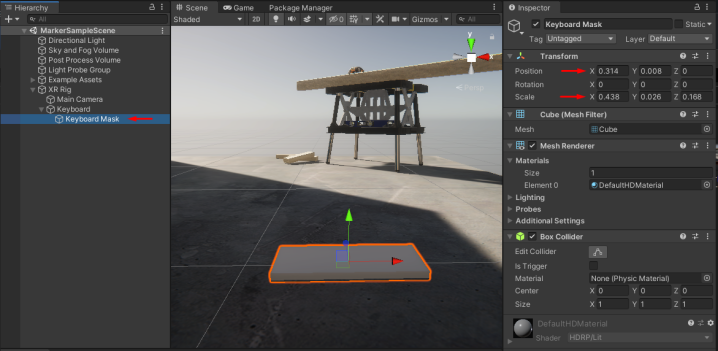
In Unity Editor, add a GameObject with a mesh for the mask as a child of the tracked GameObject. For the best quality you would want the mesh to be shaped like the physical object. For the sake of simplicity, we use a Cube primitive and just match the scale of the GameObject with the size of the keyboard.
Measure the offset from the center of the printed Varjo Marker to the center of your keyboard and set this offset as the local position of your mask.
Follow the instructions in Masking with Varjo XR Plug-in to set up a video see-through mask in your project.
Assign the VST Mask material for your mask mesh.
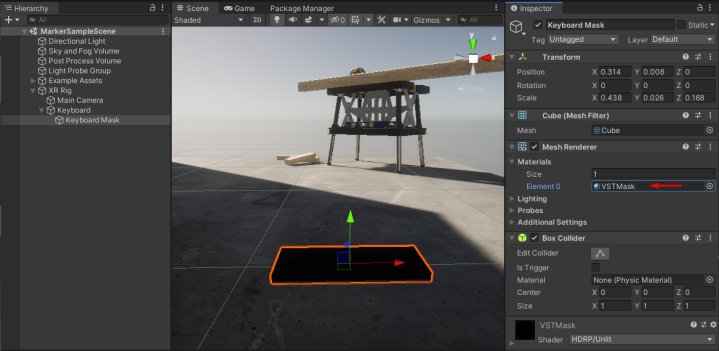
Press Play and you should be able to see your keyboard inside your virtual environment. If the Varjo Marker is attached to the keyboard, you can move the keyboard and the mask will follow.