Third-party tracking
Note: you are currently viewing documentation for a beta or an older version of Varjo
Developing a tracking plugin for Varjo
In order to use a third-party tracking system, you will need to use the Varjo Tracking Plugin SDK available on the Downloads page. For installation instructions check the plugin installations instructions.
Tracking Plugin API
Before starting to implement tracking plugin support, please read through this page as it describes all the processes and functions that are accessed through the Varjo API.
The following structure describes tracked device pose:
typedef struct varjo_DevicePose {
   varjo_Nanoseconds timeStamp;     //!< Pose timestamp (ns)
   int64_t frameNo;                 //!< Frame number, increases monotonically.
   varjo_Vector3D position;         //!< Device position (m)
   varjo_Quaternion rotation;       //!< Device rotation
   varjo_Vector3D velocity;         //!< Device linear velocity (m/s)
   varjo_Vector3D angularVelocity;  //!< Device angular velocity (radians/s)
   varjo_Vector3D acceleration;     //!< Device acceleration (m/s^2)
   varjo_PoseFlags poseFlags;       //!< Bit field value describing pose
   double confidence;               //!< Tracker confidence
} varjo_DevicePose;
The following definitions explain the types of data stored in the pose:
struct varjo_Vector3D {
    double x;  //!< X coordinate.
    double y; //!< Y coordinate.
    double z;  //!< Z coordinate.
};
Tracker coordinates:
 struct varjo_Quaternion {
    double w;
    double x;
    double y;
    double z;
};
Double precision quaternion for tracker rotation.
 typedef int32_t varjo_Bool;
 typedef int64_t varjo_Nanoseconds;
Time is in nanoseconds. Absolute times are relative to an epoch which is constant during execution of the program.
Note: To change pose values you need to set poseFlags.
 pose->poseFlags = varjo_PoseFlags_Ok |   //
		varjo_PoseFlags_HasPosition;
The modified example tracker will update the position value. All the possible pose flags are documented in the API docs.
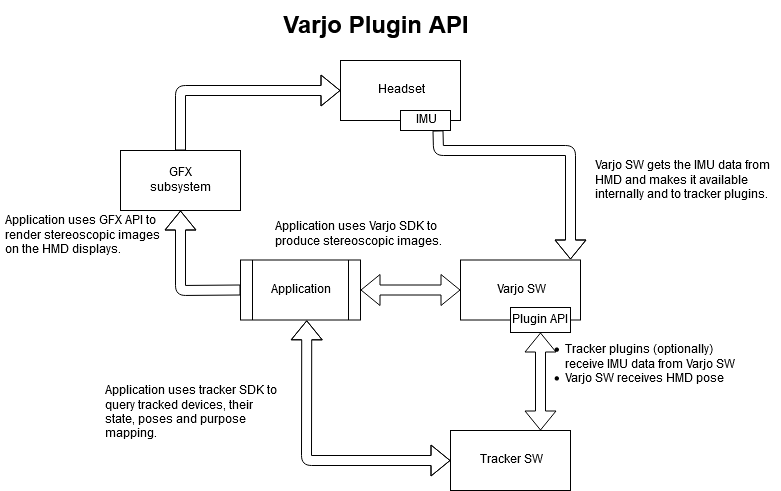
VARJO PLUGIN API
The following scheme describes the flow of the Varjo Plugin API (the Plugin API is located below Varjo SW).
TRACKING POINT LOCATION
The tracking point of the HMD is located between lenses as shown in the diagrams below.
The coordinate system for the HMD is right-handed, positive X goes right, positive Y goes up, and negative Z goes forward from the HMD user’s perspective.
In VR-1, XR-1 and VR-2 series HMDs, the IMU is located (from the HMD user’s perspective):
- 0.5mm to the right, 13.4mm down and 57.2mm forward from the HMD tracking point;
- IMU is oriented so that its positive X points right, positive Y points down and positive Z points forward.
![]()
![]()
![]()
Your tracking plugin can be initialized using varjo_PluginInit.
Use varjo_TrackerStart to begin tracker processing and varjo_TrackerStop to end tracker processing.
In order to get the current tracker pose for HMD, use varjo_GetHMDPose.
End the session with deinitialization of your tracking plugin using varjo_PluginShutdown.
USING A TRACKING PLUGIN
Tracking plugin installation
The plugin supplied by the tracking system vendor should be installed in the location specified by the vendor.
Tracking plugin registration and selection
After the installation, the plugin should be made available for the Varjo software stack. This is done by writing a JSON file, (also known as a plugin manifest file) containing the plugin description.
This file should be installed in:
%ProgramData%\Varjo\VarjoTracking\Plugins<vendor_name><tracking_product_name_plugin>.manifest
Notes:
- The manifest file name can be arbitrary
- Manifest file name extension must be .manifest Plugin manifest file is a JSON file containing following information:
    {   "manifestFileVersion": "1.0.0.0",
        "ID": "<GUID>",
        "vendorName": "<Tracker system vendor name>",
        "productName": "<Tracker product name>",
        "path": "<absolute path to the tracker plugin DLL>",
        "configurationOptions": []}
Example:
    {   "manifestFileVersion": "1.0.0.0",
        "ID": "{E6F31B4E-015F-4719-BDDB-8758E400A6BC}",
        "vendorName": "Vendor",
        "productName": "Advanced Tracker",
        "path": "C:\\Program Files\\Vendor\\Product\\Plugins\\Varjo\\Plugin.dll",
        "configurationOptions": [        {
        "id": "serverAddress",
        "label": "Server IP address",
        "type": "text",
        "defaultValue": "192.168.0.1"        }    ]}
Notes:
- All fields should be UTF-8 encoded
- Field productName is allowed to contain an empty string
- Field ID is an RFC-4122 UUID in Microsoft GUID format e.g.: {123e4567-e89b-12d3-a456-426655440000}
- Configuration options listed in the configurationOptions array will be shown in the VarjoBase UI.
The VarjoTracking process on start-up will enumerate all manifest files in the subdirectories of the %ProgramData%\Varjo\VarjoTracking\Plugins folder. All the manifests will be validated, and plugins that pass validation will communicate to Varjo software. VarjoBase will show all of the available tracking systems in the UI, and the user will be able to select the tracking system of their choice.
You can find functions that are affecting your tracking plugin behavior with Varjo API in varjo_PluginUtilityAPI.
Tracking Plugin API Update to allow user configuration
You can now specify persisted configuration options that the user can edit on Varjo Base. Steps to add this feature to your plugin:
- Modify your plugin.manifest and add configurationOptions to it where you specify what user can edit. For example:
    "configurationOptions": [
        {
            "id": "serverAddress",
            "label": "Server IP address",
            "type": "text",
            "defaultValue": "192.168.0.1"
        }
    ]
-
Use PluginUtilityAPI’s GetConfigurationString, SetConfigurationString and SyncConfiguration C++ API to get access to the configuration. Please check Varjo Plugin SDK for more detailed information.
-
After installing the plugin and restarting Varjo Base you should be able to see the configuration options in Varjo Base under System tab. Select your plugin and change configuration and click submit and they should go to your plugin.
-
You can use PluginUtilityAPI’s SetPluginSystemState to communicate plugin state to Varjo Base.
The plugin state is shown above the configuration options.
![]()
![]()
![]()