Foveated Rendering
Note: you are currently viewing documentation for a beta or an older version of Varjo
Foveated rendering makes use of the eye tracking functionality in Varjo headsets to improve performance by reducing the image quality in peripheral areas where the user is not looking.
Foveation allows applications to render fewer pixels and achieve a better VR experience. Two foveation modes are supported by the Varjo SDK:
- Dynamic viewports
- Variable-rate shading (VRS)
Table of Contents
Dynamic viewports
Foveated rendering with dynamic viewports means that the focus projection is changed based on gaze. This way the focus textures contain a view based on where the user is looking. Without foveated rendering, the focus projection is fixed in the center.
With dynamic viewport foveation, it is possible to use a texture size up to 50% smaller without sacrificing image quality. The final image quality depends on multiple factors such as scene details and post-processing effects (for example, temporal anti-aliasing can greatly improve quality).
Applications should be prepared to render the frame into high resolution and lower resolution textures, so that the application can fall back to fixed rendering if necessary (for example, if the gaze is not available). There is no need to create a separate swapchain, however, since the same texture can be used for both fixed and foveated rendering with the help of viewports. A separate swapchain is only necessary if the engine does not allow you to set a custom viewport and always renders into the full texture.
Application flow
-
Create a texture atlas that is big enough for both fixed and foveated rendering. You can query the recommended texture sizes with
varjo_GetTextureSize(), but it is also possible use other texture sizes. -
Create two sets of viewports for the atlas texture (see the
calculateFoveatedViewports()function for an example). -
Enable gaze with
varjo_GazeInit(). It is not necessary for the user to calibrate eye tracking at this point. The application can continue without calibration but foveated rendering will not be active. -
Query the rendering gaze with
varjo_GetRenderingGaze(). -
Query the tangents for the field of view based on the rendering gaze with
varjo_GetFoveatedFovTangents(). The function takes the previously queried rendering gaze and view index as parameters. -
Get projection matrices based on tangents with
varjo_GetProjectionMatrix(). The function takes the previously queried tangents as parameter. -
In the render loop, use the newly acquired projection matrices to render focus views. Important: The matrices must be recalculated for every frame since it will change based on gaze.
-
Use foveated viewports to render the frame.
-
Add
varjo_LayerFlag_Foveatedintovarjo_LayerHeaderflags when submitting the frame.
Example: How to create viewports for the atlas texture
std::vector<varjo_Viewport> calculateFoveatedViewports(varjo_Session* session) {
    const int32_t viewCount = varjo_GetViewCount(session);
    std::vector<varjo_Viewport> viewports;
    viewports.reserve(viewCount);
    int x = 0, y = 0;
    for (int32_t i = 0; i < viewCount; i++) {
        int32_t width = 0, height = 0;
        varjo_GetTextureSize(session, varjo_TextureSize_Type_DynamicFoveation, i, &width, &height);
        const varjo_Viewport viewport = varjo_Viewport{x, y, width, height};
        viewports.push_back(viewport);
        x += viewport.width;
        if (i > 0 && viewports.size() % 2 == 0) {
            x = 0;
            y += viewport.height;
        }
    }

    return viewports;
}
Example: How to acquire the projection matrix for foveated rendering
// In render loop
bool useFoveatedRendering = false;
for (uint32_t i = 0; i < m_viewCount; ++i) {
    ...
    // Query the rendering gaze
    varjo_Gaze gaze{};
    varjo_FovTangents tangents{};
    if (varjo_GetRenderingGaze(m_session, &gaze)) {
        varjo_FoveatedFovTangents_Hints hints{};
        tangents = varjo_GetFoveatedFovTangents(m_session, i, &gaze, &hints);
        useFoveatedRendering = true;
    } else {
        // Fallback if gaze is not available
        tangents = varjo_GetFovTangents(m_session, i);
    }
    varjo_Matrix projectionMatrix = varjo_GetProjectionMatrix(&tangents);
    // Continue to render with the newly acquired projection matrix and respective viewports
    ...
}

// Remember to add the flag
varjo_LayerFlags flags = varjo_LayerFlagNone;
if (useFoveatedRendering) {
    flags |= varjo_LayerFlag_Foveated;
}
Variable-rate shading
Another technique to improve frame rate is variable-rate shading (VRS). VRS is available in different graphics APIs in slightly different ways, although the basic idea remains the same.
- D3D12 supports VRS natively. For more information, see the MSDN documentation.
- D3D11 supports VRS through NVApi. For more information, see VRWorks. For this option the NVApi library needs to be linked, and Varjo does not redistribute the library.
- OpenGL supports VRS through extensions. For more information, see VRWorks and the OpenGL extension
The Varjo SDK provides functions to generate a VRS map:
void varjo_D3D12UpdateVariableRateShadingTexture(
        struct varjo_Session* session,
        struct ID3D12GraphicsCommandList* commandList,
        struct ID3D12Resource* texture,
        struct varjo_VariableRateShadingConfig* config);
void varjo_D3D11UpdateVariableRateShadingTexture(
    struct varjo_Session* session,
    struct ID3D11Device* device,
    struct ID3D11Texture2D* texture,
    struct varjo_VariableRateShadingConfig* config,
    struct varjo_ShadingRateTable* shadingRateTable);
void varjo_GLUpdateVariableRateShadingTexture(
    struct varjo_Session* session,
    unsigned int texture,
    int width,
    int height,
    struct varjo_VariableRateShadingConfig* config,
    struct varjo_ShadingRateTable* shadingRateTable);
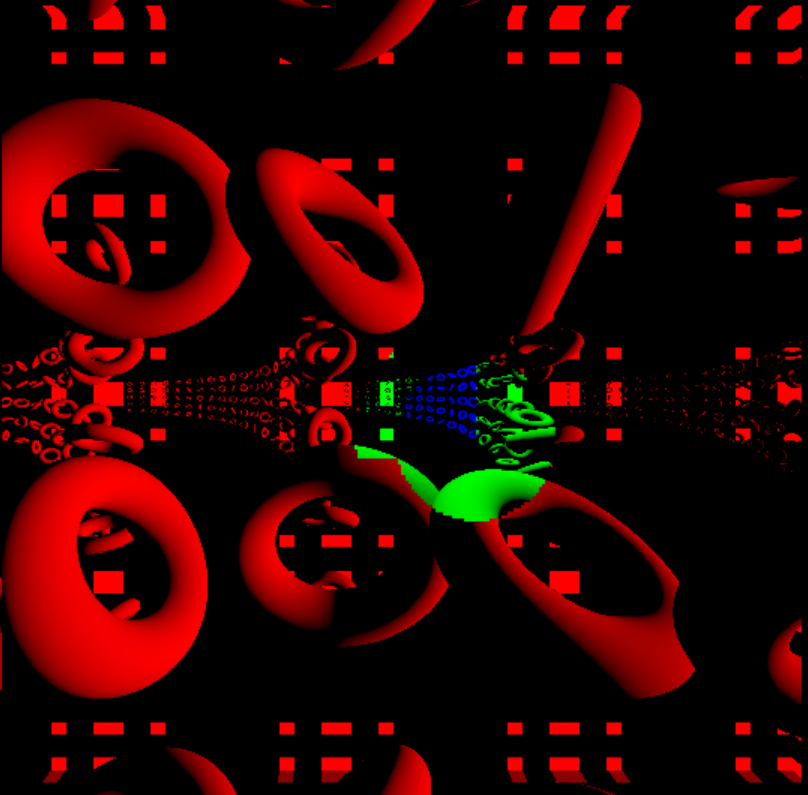
The following image shows how this can be beneficial:
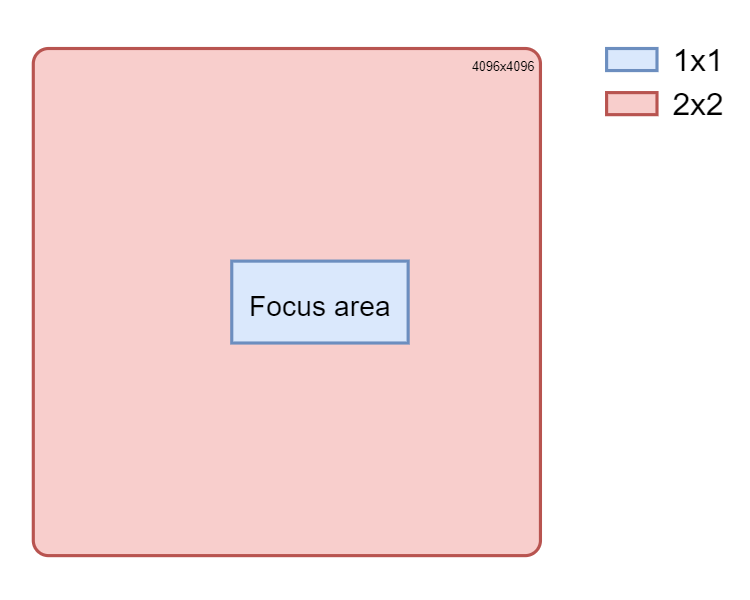
To generate a high-resolution image inside the focus area, we need to render four times the number of pixels in the context area which will negatively impact performance. However, with the help of VRS we can set a 2x2 shading rate, which means that the GPU will render only one pixel from a 2x2 square.
Examples
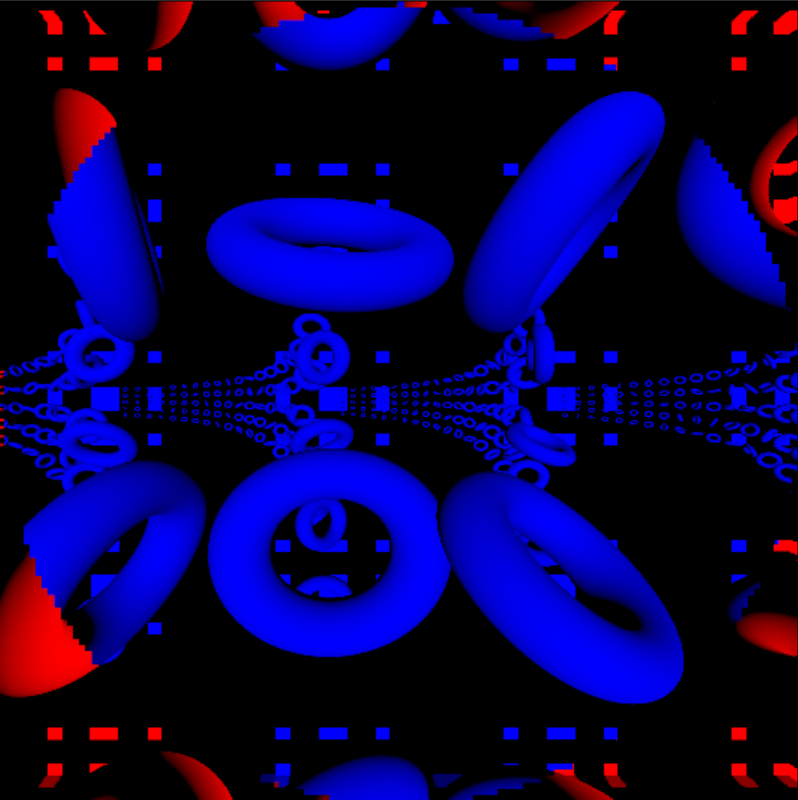
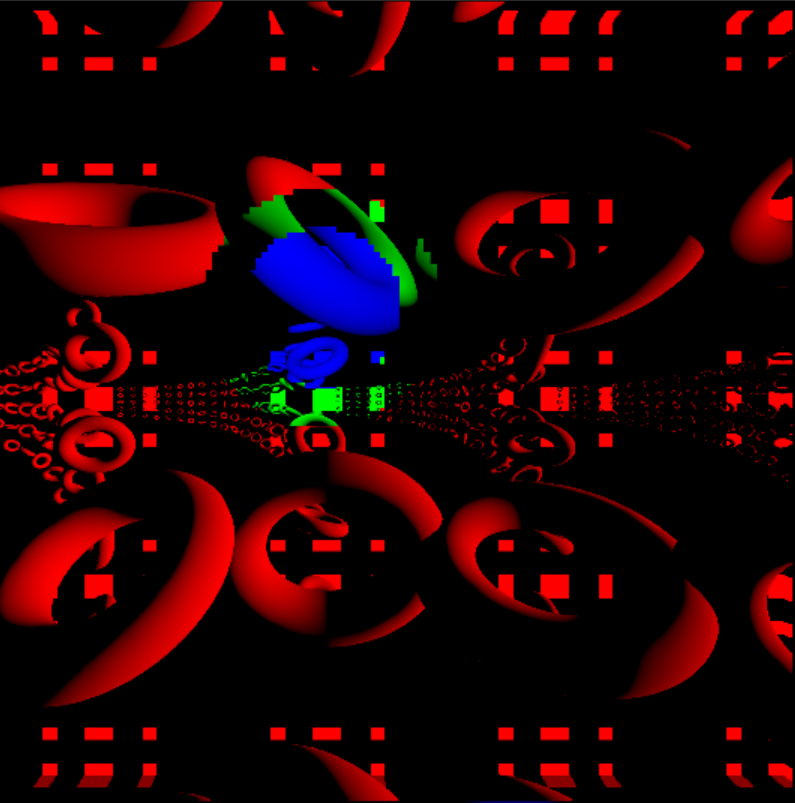
The following are examples of what VRS looks like when overlaid on top of the render target.
- Blue
1x1 - Green
2x2 - Red
4x4
VRS without gaze – Corners will be rendered with the coarsest shading rate because they are not visible in the HMD. Since gaze data is not available, we must render using 1x1 shading rate everywhere else.
VRS with gaze – Almost the entire picture is “red” because the user is looking slightly left and upward, and only that portion of the frame is rendered at full resolution. The outer edge of the circle (green) is rendered with a 2x2 shading rate.
Stereo rendering mode can also benefit from VRS. Since the texture is double the size of the context texture in quad rendering mode, there is no need to render the context area in full resolution.
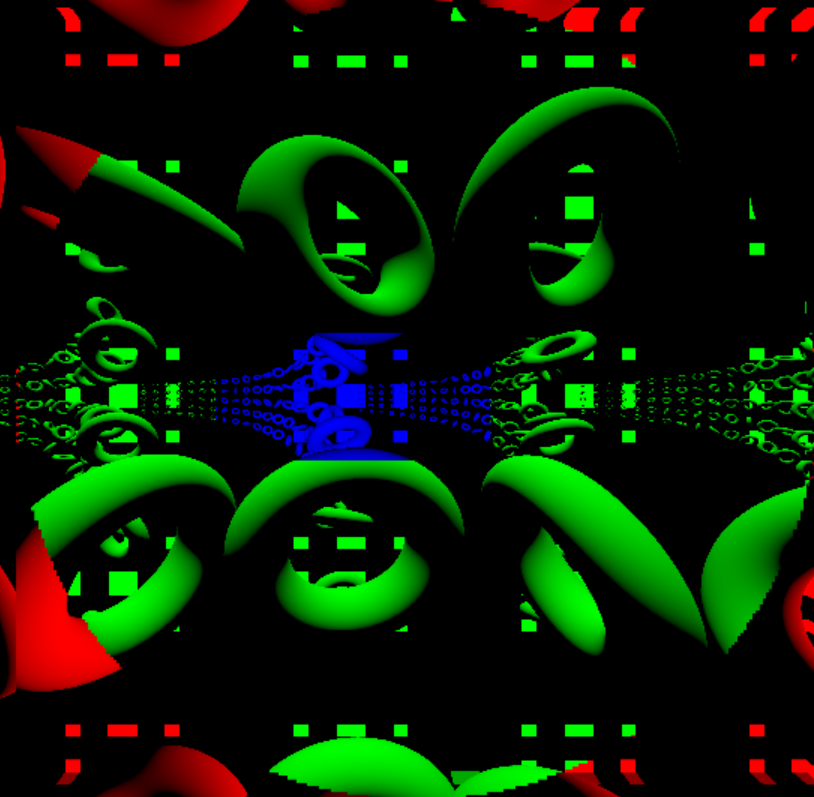
Stereo rendering mode will benefit even more when gaze is enabled. Only a very small area needs to be rendered in full resolution (part of the focus area).
Implementation example in D3D12
Check for VRS support first:
bool isVariableRateShadingSupported(ID3D12Device* device)
{
    D3D12_FEATURE_DATA_D3D12_OPTIONS6 options;
    return SUCCEEDED(device->CheckFeatureSupport(D3D12_FEATURE_D3D12_OPTIONS6, &options, sizeof(options)))
        && options.VariableShadingRateTier == D3D12_VARIABLE_SHADING_RATE_TIER_2;
}
The VRS texture has smaller dimensions than the render target. The exact size can be calculated after checking the tile size:
UINT getVariableRateShadingTileSize(ID3D12Device* device)
{
    D3D12_FEATURE_DATA_D3D12_OPTIONS6 options{};
    device->CheckFeatureSupport(D3D12_FEATURE_D3D12_OPTIONS6, &options, sizeof(options));
    return options.ShadingRateImageTileSize;
}

void getVariableRateShadingTextureSize(ID3D12Device* device, UINT textureWidth, UINT textureHeight, UINT* vrsTextureWidth, UINT* vrsTextureHeight)
{
    const UINT tileSize = getVariableRateShadingTileSize(device);
    assert(tileSize);

    *vrsTextureWidth = static_cast<UINT>(ceil(static_cast<float>(textureWidth) / tileSize));
    *vrsTextureHeight = static_cast<UINT>(ceil(static_cast<float>(textureHeight) / tileSize));
}
The VRS texture must be in the following format: DXGI_FORMAT_R8_UINT and D3D12_RESOURCE_FLAG_ALLOW_UNORDERED_ACCESS flag.
The following function updates the VRS map and command list accordingly (please check the Benchmark project for the complete source code, especially D3D12Renderer.cpp):
    commandList5->ResourceBarrier(
        1, &CD3DX12_RESOURCE_BARRIER::Transition(vrsTexture, D3D12_RESOURCE_STATE_SHADING_RATE_SOURCE, D3D12_RESOURCE_STATE_UNORDERED_ACCESS));

    varjo_VariableRateShadingConfig config = getDefaultVRSConfig(m_currentViewIndex, viewport, m_vrsTileSize, m_settings, m_renderingGaze);

    varjo_D3D12UpdateVariableRateShadingTexture(m_session, commandList5.Get(), vrsTexture, &config);

    commandList5->ResourceBarrier(
        1, &CD3DX12_RESOURCE_BARRIER::Transition(vrsTexture, D3D12_RESOURCE_STATE_UNORDERED_ACCESS, D3D12_RESOURCE_STATE_SHADING_RATE_SOURCE));

    D3D12_SHADING_RATE_COMBINER chooseScreenspaceImage[2] = {
        D3D12_SHADING_RATE_COMBINER_PASSTHROUGH, D3D12_SHADING_RATE_COMBINER_OVERRIDE};  // Choose screenspace image
    commandList5->RSSetShadingRate(D3D12_SHADING_RATE_4X4, chooseScreenspaceImage);
    commandList5->RSSetShadingRateImage(vrsTexture);
For more information regarding the implementation, see the example code in Varjo SDK for each graphics API.