Updating an existing Unity project
Note: you are currently viewing documentation for a beta or an older version of Varjo
Note: This page explains the necessary steps needed to launch your existing Unity project on the Varjo headset. If you are creating new project from scratch, refer to the “Creating a new Unity project“. Before updating the project, ensure the Unity plugin is installed correctly.
- Open the project you want to launch in the Varjo headset.
- Change Unity settings to match the required setting.
- Drag VarjoUser prefab to the scene.
- Copy and modify desired camera settings effects to the VarjoCamera from your camera.
- Copy and modify desired movement scripts to the VarjoUser / Tracked hands.
- Remove the old camera from the scene.
- Hit play to test.
UPDATING THE PLUGIN
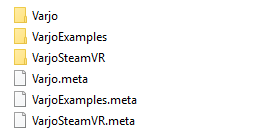
When updating the Varjo plugin for Unity, please close Unity and delete the following files and folders inside the Assets folder before unzipping the updated plugin:
- Folders:
- Varjo
- VarjoExamples
- VarjoSteamVR
- Files:
- Varjo.meta
- VarjoExamples.meta
- VarjoSteamVR.meta
Do not directly edit the prefabs and scripts in these folders as they will be replaced with each update.

If you leave Unity open, it will lock the plugin DLL files and the update will fail. If you don’t delete the previous files, there might be unwanted files left from the previous plugin version.